Fix your low back pain with better body mechanics

Too much sitting is hard on our bodies and can add to the prevalence of low back pain. Twenty-six bones make up the spinal column with three gentle curves from top to bottom. For many with low back pain, the cumulative effects of constant or repeated small stresses over time, like sitting, result in back pain. Too much sitting, combined with faulty posture, can flatten these curves over time. The spine is designed to function best as a weight-bearing structure, with the lumbar curve in a neutral position. Sitting rounded, or slumped in a seat, multiplies damaging pressure on lower back discs and soft tissues. Another concern is that prolonged sitting chronically shortens the hip flexors. Once again, too much sitting, prevalent in our modern age, has other drawbacks and can cause secondary health concerns, such as high blood pressure and increased risk for diseases like diabetes, obesity and cardiovascular disorders.

The good news is that low back pain can dissipate. Body composition, strength of the core musculature and faulty movement patterns are all potential cause of low back pain. Most back pain is easy to reverse; the secret is addressing common musculature imbalances. Too much sway or arch in the lower back, too much bending, weak or overstretched muscles, or poor posture are contributing factors that can be corrected to ensure a healthy back.

If you are in pain, but not dealing with diagnosed or undiagnosed medical issues, nerve impingement, or traumatic injury, you fall into the category of mechanical low-back pain.

Faulty Movement Patterns

The easiest way to fix your own pain is to correct faulty body mechanics. We know we shouldn’t bend wrong, but we do. We bend over wrong picking up laundry, petting the dog, making the bed, or looking at a phone. We work over our desks, drive and ride bent forward every day. Look around the gym and it’s a minefield of bent backs. You’ll see people lifting weights bent over, and bend over wrong to place them back on racks.

Integrated Core

The spine is at its strongest, most resilient and most supported position when it is in a state of muscular and skeletal balance, and in a neutral position.

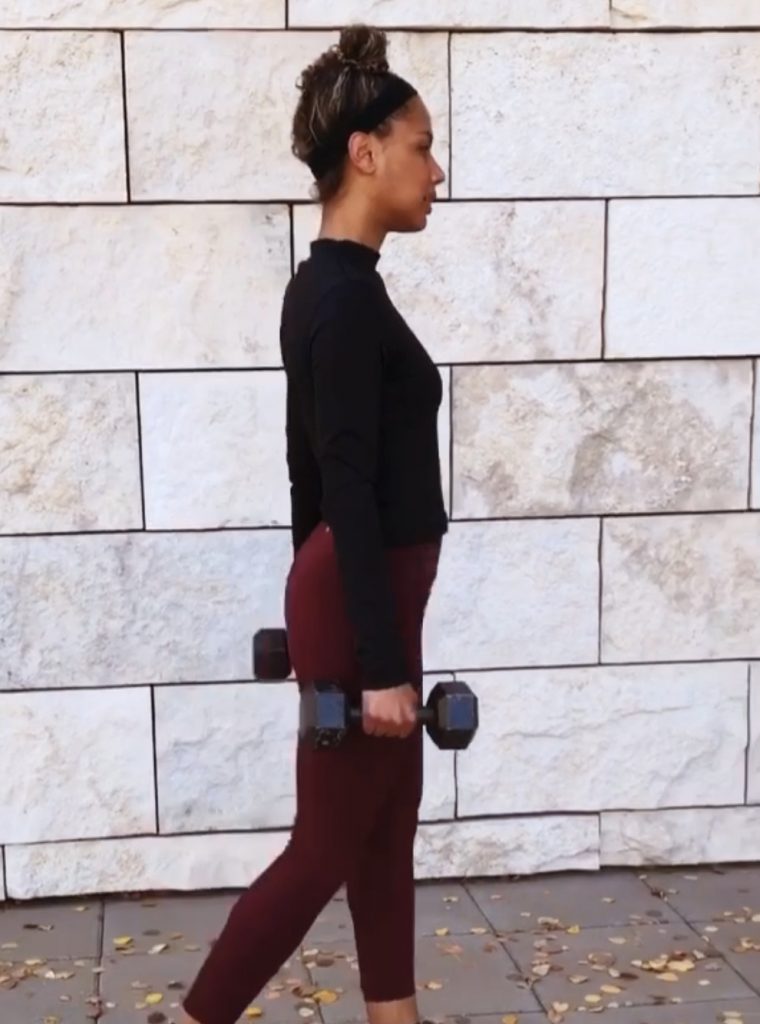
The abdominal brace is an important way to use the core to find neutral position. Bracing, says Dr. Stuart McGill, a leading spine researcher, is a different concept than that of simply holding in your stomach, or “pulling your belly to your spine.” Rather, it’s mild contraction of the abdominal muscles, as though you are preparing for a punch in the mid-section. In his book “Back Mechanic,” he asks his back patients to gradually adjust the amount of contraction to find the optimal stiffness, much like how a dimmer switch gradually adjusts light in a room. Whether you are sitting, walking, or are a high-performance athlete, all movement is orchestrated from this fine-tuned control of the core.

Next time you pick up a package, try to brace your core, hip hinge, and use your gluteus muscles, which help extend the hips to assist in standing up, sparing the lower back from over-use.

Self-Test

Here’s a simple test to see if you have neutral spine alignment, or back sway. Stand barefoot with your back to the wall, with heels, butt and shoulders against the wall. Then try to place one hand, palm down, behind your lower back. If the space is up to and in-line with your second knuckle, you have neutral pelvis. Normally the pelvis is rotated approximately 10 degrees. But if the space is large enough for your whole hand, you have a deviation, an anterior tilt of the pelvis called lumbar lordosis. Tilt the pelvis posteriorly by bringing the front of your waistband up to learn neutral, engaging the core.


Connie Aronson is an ACSM Exercise Physiologist and Corrective Movement Specialist (TBBM-CES) Visit her at www.conniearonson.com and

Instagram @conniearon

https://www.mtexpress.com/wood_river_journal/features/fitness-guru/article_9e3c776e-e5b7-11eb-a0ba-5730f013cbf7.html

Three exercises to keep your shoulders healthy

Fitness guru

All -star pitcher Pedro Martinez was one of the lucky players to return to the major leagues after a complete rotator cuff tear, typically a season-ending injury. The rotator cuff is made up of muscles and tendons that stabilize the shoulder joint. Over time, damage to the rotator cuff can become significant because of the stress placed on these structures.

You don’t have to be a world-class pitcher to have shoulder problems. Ideally, we want our shoulders open and back. The shoulder girdle is unique in that it has few joints, but many muscles that attach to the upper back, as well as the chest and arms. The upper back region is important in shoulder health, as the lower trapezius, rhomboids, and rotator cuff muscles stabilize and retract the shoulder blades.

To understand how the upper back coordinates with the shoulder, notice if you raise your shoulder when moving your arm. Notice if you tighten or raise your shoulders to turn your head to look over your shoulder when driving.

Professional baseball players have to manipulate their bodies in an incredibly complicated way to throw at astounding speeds. On the mound, pitchers have to work with asymmetries in the body, using one side of the body for many, many repetitions. Their training must involve unwinding the damage caused by this imbalance and make both sides of the body function well. For the rest of us, at play and during the day, we can train and be aware of symmetry in our upper backs and shoulders.

Her are three exercises for proper functioning of the upper back and shoulders.

21-06-18 Weekender Fitness 1@.jpg
W Stretch || Photos by Connie Aronson

1.    W Stretch. Stand up, with your core engaged. Pull the shoulders down and back. Externally rotate and fully extend the arms. You should feel it in the chest and front of the shoulder. The W stretch strengthens the rhomboids, traps and external rotators of the shoulder and arm. Hold 20-30 seconds, 2-3 times per day.

21-06-18 Weekender Fitness 2@.jpg

2.    A’s on the ball. Lie on your chest on a ball, legs straight with feet firmly on the floor. The arms are straight and close to the body, resembling the letter “A.” Raise and lower the arms, externally rotating the arms from the shoulder so that the thumbs point out and up. Throughout the exercise, keep shoulder blades down and back, chin gently pushed back. Ten reps.

21-06-18 Weekender Fitness 3@.jpg

3.    T’s on the ball. Lie on your chest on a ball, legs straight with feet firmly on the floor. Raise the arms to form a T position, palms down, then lower arms. Throughout the exercise, keep shoulder blades down and back, chin gently pushed back. Ten reps.


Connie Aronson is an ACSM Exercise Physiologist and Corrective Exercise Specialist (TBM-CES) Visit her at www.conniearonson.comand Instagram@conniearon

https://www.mtexpress.com/wood_river_journal/features/fitness-guru/article_9606c44c-cfae-11eb-8de5-cbf3271af76c.html

21-06-18 Weekender Fitness 1@.jpg
Photos by Connie Aronson

The bicycle twist is a core move for the morning

Clients often tell me about their morning sequence to start their days, and I’m always proud that they take care of themselves. A morning core program can help maintain low back health, improve neuromuscular control, spinal stability, movement pattern efficiency, and injury prevention. But any ab or core exercise you choose needs to be effective, and not potentially lead to lower back pain.

A morning program is ideal for two reasons. First it’s typically the time in which your body is stiff, cold and most prone to injury. Having a routine prior to your busy day is like doing a pre-workout warm-up: It helps to increase soft-tissue blood-flow, warmth and pliability, facilitates neurological awareness and helps develop a psychological readiness for the day ahead. Second, a morning routine gives us another chance to make our habits stick, and if you miss doing it, you have another opportunity to do it later in the day.

The Bicycle Twist is a big external oblique winner.  

If you need a little help in choosing where to start, add Bicycle Twist to your routine, one of the best core exercises. Compared to a crunch, electromyography ( EMG ) shows that this exercise is 9 % more effective at targeting the rectus abdominis and 310 % more effective at targeting the external obliques.

It’s an ab exercise that many people know, also known in Pilates as Criss-Cross, and a go-to in yoga class.

Let’s include a brief anatomical overview of the ab muscles that this exercise targets. Four abdominal muscles hold the contents of the abdomen in place; the rectus abdominis, aka “six-pack”, which stabilize the pelvis and rib cage with respect to each other, transverse abdonimis, a deeper muscle that maintains intra-abdominal pressure, and is not involved in movements of the trunk, and the external and internal obliques that work together to help decelerate the spine as it arches backwards, rotates, and side bends. The external and internal obliques store potential energy, as in a follow-through in a golf swing.

The Most Common Mistake 

The Bicycle Twist targets the abs, yet most people do it wrong, and use the hip flexors. Stop using your hip flexors! They are typically stronger than the abs in trunk flexing movements; hip flexors bring the legs and trunk toward each other. Beyond 30 degrees, in the Bicycle Twist, crunches, or sit-ups, the powerful hip flexors begin to take charge of the movement. In real life, they are more likely to be strong, as you use them to create energy to help swing your leg forward in walking and running.  

Pilates mat exercise studies using EMG found that the hip flexors in Criss- Cross work at an intensity of 41 %. In other words, when you bring your knee towards your torso, the Criss-Cross, or Bicycle Twist becomes an ineffective exercise for the abdominals. The goal of ab training is to maximize the involvement of the abdominals, and minimize the hip flexors. 

Getting it right 

Keep your knees at 90 degrees, instead of flexing the hip to pull your knee in toward your elbow. This will give the back extra support and help target the obliques. 

Connie Aronson is an ACSM Exercise Physiologist and Corrective Exercise Specialist (TBBM-CES )  Visit her at www.conniearonson.com and  Instagram@conniearon

https://www.mtexpress.com/wood_river_journal/features/fitness-guru/article_a62eb6d4-61a6-11eb-bcfb-3f5fb75e1f4c.html

Build core power and stability with the Farmer’s Walk

Featured

The Farmer’s Walk is a great whole-body exercise.

Core stability is imperative for all facets of movement and performance, whether you’re a skier or skater.

As a new ski season kicks off, core strength can be a great asset to ski at a higher intensity, for a longer duration and with less fatigue. When you hit the terrain, you’ll want to have good core stability to not only turn well, but also handle different and varied snow conditions with ease. It’s not too late to add a great whole-body exercise called Farmer’s Walk—a walk with a weight—to your training program.  

Walking or any lower body movement where you carry or “load” yourself with a weight for a predetermined distance or time challenges the entire kinetic chain of the body and targets the deep stabilizing muscles of the core.

What is core stability?

The definition of core stability is your ability to maintain your posture and balance while moving your extremities. Sound a lot like skiing?

The core musculature has a unique function. Throughout the day, if you’re active, the core muscles act to stiffen the torso and function primarily to prevent motion. A strong core allows the strength to radiate out peripherally to the rest of the body.

Core stability is imperative for all facets of movement and performance, whether you’re a skier or skater. The Farmer’s Walk is a great whole-body exercise. The exercise targets the abdominals, and provides peak activation of all the muscles that support the spine, the gluteus maximus, gluteus minimus and cervical spine muscles during the walk. You’ll hit all the core muscles of the trunk and pelvic stability muscles, as well as the hips.

Together, these numerous and multi-jointed muscles are known as the lumbo-pelvic hip complex.

You can think of Farmer’s Walk as a vertical plank, a move that challenges the lumbo-pelvic hip complex. There are several variations of loaded carries, and here are two variations that will strengthen your core as well as challenge the body’s stabilizing system.

Unilateral Farmer’s Walk

Unilateral training exposes any asymmetries in the body. Noticeably, walking with a single weight provides a greater spine load than if the load were split between two hands. (For beginners, you might want to experiment with carrying a weight in each hand.) Carrying one weight targets the lateral spine muscles, called quadratus lumborum, and the lateral abdominal wall, which have an important role in that they stiffen the pelvis to prevent it from bending to the side of the leg swing.  The unilateral Farmer’s Walk also enhances the rotational demand to the core as the body now has to control the added stress in order to maintain dynamic balance.

 Choose weights that are challenging yet appropriate for your fitness level.

•    Squat down and grasp a weight in one hand. Maintain a braced core, and return to a stand-tall position.

•    Take slow and controlled steps forward for 30 seconds. Alternate sides.

Unilateral Farmer’s Walk

Unilateral Waiter’s Walk

An added benefit to this move is that it helps strengthen the muscles around the shoulder, referred to as glenohumeral stability, a term used to describe how the arm bone sits well into the shoulder and upper back muscles. Here’s how it’s done.  

•    Grab a weight in one hand and return to a stand-tall position.

•    Extend arm up overhead.

•    Keep a tight grip on the weight and take slow controlled steps forward for 30 seconds. Alternate sides.

Unilateral Waiter’s Walk

https://www.mtexpress.com/wood_river_journal/features/ski-fitness/article_9112101c-2db6-11eb-9a56-e30f89e1d500.html

Work ( out ) from home

Featured

Try this new six-move fitness routine to break your pandemic rut

One way to feel better is to get back on a routine. The best approach to longevity, vitality and independence is through consistent exercise.

Did you ever imagine living through a pan- demic? More than ever, we’re all chal- lenged to be resilient. For many of us, our routines are shot and the new normal is still unfolding. One way to feel better is to get back on a routine. The best approach to longevity, vitality and independence is through consistent exercise.W

The human body has more than 635 muscles, 206 bones and 360 joints—an incredible wonder. Now is a good day to start taking good care of that wonder.

Here’s your arsenal, a creative, effective home program to help you get started or relight your pas- sion for a routine. Keep it short and sweet by pick- ing a few key muscle strengthening and flexibility/ mobility exercises. The following six moves use simple home exercise equipment: free weights or a milk jug, a golf ball and resistance bands. You can do the routine while catching up with the news or a show. Try to do each exercise for one minute and repeat the circuit twice.

1. Golf ball roll

Massage your feet with the golf ball roll to reju- venate the plantar fascia on the underside of your foot. All the muscles of the lower leg attach on the bottom of your foot. This connective tissue can get irritated and sore if you tend to continually stand with your feet falling inward, or after a summer of wearing flip-flops. Also, if your ankles don’t bend easily in a squat, this self-myofascial release exercise will help.


Place a golf ball under each foot and roll it back and forth until you hit a sore spot. Don’t overdo it, but increase pressure on that particular spot until it feels better. If a golf ball is too uncomfortable, use a tennis ball instead.

One minute each foot, preferably daily.

2. Step back with arm reach

Stretching your calf right after golf ball rolling helps immensely, as you’ll feel this stretch all the way up the back of your leg. This big bang-for-your- buck stretch targets the calf muscles, the hip flexors and the whole front body.


Start with your feet hip width apart and take a normal-size step back with the right leg. Simulta- neously fully extend the right arm up. Be sure the feet are placed straight forward. Keep your inner arches lifted and press down through your heel. Do three to four times and repeat on the left side.


Strengthen all your leg muscles with this move. Lean back against a wall, knees slightly bent. Pick up your left leg and cross it over your right knee. Try not to laterally shift your hips more than an inch or two. Slide down until your knees are level with your hips. Extend your arms and hold posi- tion for as long as you can. Build up to one minute. Switch legs.

4. One-minute clamshell

This is a time-tested favorite of clients who want the best butt exercises. The one-minute clamshell focuses on the gluteus maximus, an external rota- tor of the hips. This big muscle also pushes the hip forward. The glute maximus attaches to your lower leg via the IT band. When working properly, these muscles help to slow down pronation and internal leg rotation. In other words, if your butt muscles are weak, your knees will typically fall inward.

Place a mini-band above your knees. Lie down on your side, with knees bent and feet stacked on each other. Lift the top knee up, like an open clamshell, until there is tension on the band. Keep tension on the band for one minute. Repeat on the other side.

Tip: Minimize any spine or pelvic motion through strong abdominal bracing.

5. Single leg bridge with extension

This is an important exercise for the lumbo-pel- vic hip area, the core. There are 29 muscles attached to this area and keeping your core strong is essen- tial for a strong and stable spine.

Lie face up on the floor with your knees bent. Feet are flat on the floor. Relax your arms by your side.
O

Simultaneously tighten the glutes and brace the core. Smoothly raise the hips off the floor until you form a straight line from your knees to your shoulders. Extend one leg out at knee height. Lift and lower the extended leg up towards the ceiling and back to knee height 10 times.

Tips: Focus on a powerful glute contraction. Keep the load on your shoulders, not your neck. Try not to rotate through the hips.

If you can’t fully extend in the bridge position, it could mean the hip flexors are tight. (Go back to move No. 2.)

6. Half kneeling halo

You can make a standing core exercise more effective by dropping to a kneeling position. When you kneel, you have to engage your core to keep balanced, as your knees can’t grip the ground in the same way your feet can when standing. Plus, by driving the back foot into the ground, you recruit more glute muscles. The half kneeling halo also allows for another great hip flexor stretch, interwoven into a great core and shoulder move.

Start in a kneeling position with a weight or milk jug in front of your chest, elbows pointed to the floor. Brace the core, and “trace” or halo the weight around the head. Keep the weight very close to your head. The weight makes a full revolution and ends directly in front of the chest, elbows pointing to the floor. Immediately repeat in the oppo- site direction.

Tip: A common mistake is for the weight to complete the halo, but not the elbows. Make sure the arms and elbows return to the start position. Keep the chin tucked. R

Connie Aronson is an ACSM Certified Exercise Physiologist and Cor- rective Exercise Specialist. Follow her at www.conniearonson.com and on Instagram @conniearon.

Published in the Idaho Mountain Express- Remote Living: A guide to the new normal October 7, 2020

Sore neck? 2 quick fixes for forward head

If it’s your habit that your head juts forward and is ahead of your shoulders, you can learn how to fix this common musculoskeletal imbalance.


  • by CONNIE ARONSON

If you feel like you have the weight of the world on your head right now, it could be time to change that situation. If it’s your habit that your head juts forward and is ahead of your shoulders, muscular neck and head pain could be the culprit. It’s very possible that headaches, jaw pain or grinding noises in the jaw could be the result of your forward head. When you have a forward head position, your body’s center of gravity shifts forward and increases the weight of your head in relation to the body. Your head effectively weighs almost as much as two bowling bowls, if it is only 2 inches forward and out of alignment with your upper back.

Imagine the head as round as a ball perched on top of the spine. In real life, the head rests on the most mobile part of the spine, the neck. Because of the small base it sits on, the head becomes more like a large ball sitting precariously on a seal’s nose. The numerous neck muscles that hold your head up all work together to keep your head sitting correctly on top of your shoulders, whether you’re riding a bike, doing crunches, walking or running. However, if you are constantly looking down at your phone, or watching a lot of television, the front neck muscles become weak from being continually stretched forward. When you align the head in an optimal anatomical position, you align the entire upper back, shoulder girdle and ribcage.

There are two common muscle imbalances in the head and neck. One is your head being too far forward, (forward head) and the second one is excessive cervical lordosis, when the muscles in the back of the neck are chronically shortened. For example, suppose you are watching a great movie on a big screen, and you sit slouching, looking up. Sitting like this causes the position of your neck to arch backward to keep your eyes on the show. This position of holding your head up, with your eyes looking up, is a deviation. You’re slumped. When you later try to correct your posture by tucking your chin, those very muscles and fascia on the back of your neck can feel painful or irritated.

Quick fix: How to tell if your head is too far forward

Here is a quick and easy assessment to see if you have forward head. You can also do this alignment check at any time during the day to see if you are practicing good head carriage and posture.

  • Sit on the edge of a chair. With your index finger, find the part of your cheekbone that protrudes outward most, just below your eye. Gently place your index finger there.
  • With an imaginary line, place your other index finger directly below your top finger, on your collarbone. They should be vertically aligned.
  • If the end of the finger on your cheekbone is ahead, your head is too far forward

Tennis ball rejuvenation

A tennis ball is a great inexpensive tool to help you loosen up tight sore muscles. Lying down, place a tennis ball on one side of your neck, and move around a little to find a sore spot. Once there, try to breath and relax on that particular spot. Do for one minute, every day, on each side of the neck. Click on video to see the exercises: vimeo.com/manage/427520367/general.


Connie Aronson is an ACSM-certified exercise physiologist at the YMCA in Ketchum. Learn more at www.conniearonson.com.

https://www.mtexpress.com/wood_river_journal/features/fitness-guru/article_2a3367a6-ac2e-11ea-b3ee-d73273a6435f.html

Your feet-why they need extra care

When we walk, our feet and ankles absorb impact and force from above and the ground. Our feet need tender loving care because of this.

During this overwhelming pandemic, walking is like a lifeline. People are walking more than ever. You can use this time to improve your alignment and movement skills, starting with your feet.

When we walk, our feet and ankles absorb impact and force from above and the ground. Our feet need tender loving care because of this. Your feet have 52 bones and over 100 ligaments, with 40 muscles and tendons connecting the muscles to these bones. They all form the foundation of the human body. Having healthy feet and ankles means that they can keep your body balanced and can withstand the pressure of standing and moving. That pressure needs to be evenly distributed throughout the lower legs all the way up to the head.  

The average American walks 3,000 to 4,000 steps a day. When you walk, the pressure on your feet increases by 50 percent, and increases even more during an hour of strenuous exercise, cushioning up to one million pounds of pressure. If the feet and ankles are not functioning optimally, it could create some problems through the entire muscular system.

Other areas of the body will be affected as they shift further out of alignment to try to maintain balance.

Our gait affects the whole body, from the moment your heel hits the ground and your weight is transferred through a system of arches that displace forces. The muscles of your feet and lower leg react as our arches drop and roll with gait. The feet and ankle also must know how to adapt to changes in surfaces, like steps or uneven terrain. If your ankles don’t bend, for example, or your knees roll inward, called pronation, not only is your walking gait off kilter, but the knees, hips, lower and upper back can be affected because of musculoskeletal imbalances.

  1. How do they look?

Take a moment to look at your feet. Notice if your big toes have bunions or calluses, or if that toe has moved towards the other toes, rather than pointing straight ahead. Are your lesser toes curled up and flexed?These conditions are called hammer, claw or mallet toes. Are your arches collapsed? Are your feet turned outward as you stand? All of these checkpoints affect the position of the knee, so you can begin to understand the importance of distributing your weight evenly through your feet.

2. Golf and tennis ball roll.

Give your feet a home massage by rolling a golf ball under your foot for a few minutes every day. This exercise helps rejuvenate the plantar fascia, a broad dense tissue on the underside of your foot, where the muscles of you lower leg attach.

Place a golf ball under your foot, and roll the ball back and forth, until you feel tender or sore spots. Pause on the sore spots, until you feel the sore spot release. If the golf ball is too painful, use a tennis ball. You can also add an active stretch by pulling your toes up while rolling.

Do this myofascia release exercise as you sit watching TV, or by your bed to do first thing in the morning.

3. Toe Stretch.

After you golf or tennis ball roll, stretch the underside of your foot to increase the flexibility of your toes and ankle. Stand barefoot, one foot forward, with your toes pushed up against the wall. Keep the ball of your foot and base of the toes in contact with the floor. Slowly lean in, moving the knee inward. Hold for 10-15 seconds, and repeat.

Take at look at the exercises at

https://vimeo.com/user77012133/review/415371796/a971589693

https://www.mtexpress.com/wood_river_journal/features/fitness-guru/article_10c8774a-90b1-11ea-8d1c-3b262b6c1d24.html